MNXtoSVG


For a more general description of this application, see the README file in its main repository.


Usage

Notes:
  1. This application is designed to be used in debug mode in Visual Studio, not as a finished tool.
  2. Files and Folders in this documentation refer to files and folders that can be found in the GitHub repository.
  3. I have added a number prefix to the original file names, so that they list in the order given in
    MNX by Example.

Input folders and files

MNX.Main/MNX_in/mnx: This folder contains one or more .mnx files.
MNX.Main/MNX_in/png: contains, for reference, copies of the corresponding (MNX by Example) .png files.
MNX.Main/MNX_in/form1Data: contains an .f1d file for each .mnx file in the mnx folder. These files contain basic formatting information for each corresponding .mnx file, and are edited by this application (see below).

Output folders and files

MNX.Main/SVG_temp: This is where the applicaton saves its output. Files in this folder are not uploaded to the GitHub repository.
MNX.Main/SVG_out: When an example has been completed, and the SVG is ready for publication, it is copied into this folder by hand. Files in this folder are uploaded to the GitHub repository where they can be publicly viewed. (Right-Click the viewed example in GitHub to download it into a browser.)

Directory structure summary:

MNX.Main is one of the six (.dll) projects in this application.
The complete list, in order of dependency, is currently (May 2020):
MNX.Globals — Application-wide constants and functions
Moritz.Xml — The SVG Writer
Moritz.Spec — Basic object definitions
MNX.Common — The MNX-Common parser
Moritz.Symbols — SVG definitions, Metrics
MNX.Main — The GUI with input and output directories.
MNX_in
mnx — .mnx files
png — .png files from MNX-Common by Example
form1Data — formatting data to be edited in the main form
SVG_temp — used while testing
SVG_out — completed examples, viewable on GitHub


Usage

When the application starts up, the .mnx file names are loaded into the main file selector (top, middle).
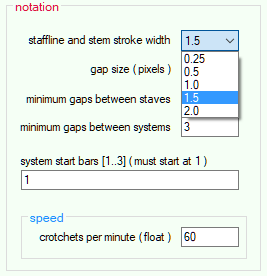
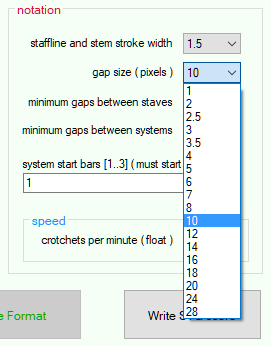
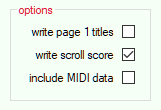
The selector is set to the first file in the mnx folder, and the corresponding formatting information is loaded from the form1Data folder into the corresponding input fields on the form.


The formatting information for other examples is loaded using this selector:


The basic stroke width is selected in the "stafflines and stem stroke widths" selector.
Other stroke widths (e.g. thick barlines etc.) are set on the basis of the value selected here.
Formatting that is not available on this form constitutes the application's "House Style".


The vertical distance between stafflines (the "gap") is defined using the gap selector:

If an example has more than one bar, system breaks can be set using the "system start bars" field:
(This is how the help line looks when a 3-bar example is loaded.)

The input here must be a list of bar numbers, each separated by a space or comma character.
(The form does plausibility checking everywhere, and activates the appropriate buttons accordingly.)

If there are no errors on the form and it has been saved, clicking the "Write SVG score" button will create an output SVG in the SVG_temp folder.


Options


  1. write page 1 titles: writes the title and author (from the metadata) at the top of page 1.
  2. write scroll score: writes the score's systems, one above the other, on a single page that is high enough to accomodate all the systems. Such scroll scores are useful on the web. If this option is unchecked, the systems will be written on separate pages (for printing on paper).
  3. include MIDI data: If this option is selected, temporal information will be embedded (using a dedicated namespace) in the SVG score's <g class="chord"> and <g class="rest"> elements.
    This option is not currently being tested, but the code already exists (inherited from Moritz).


ji www 05.05.2020